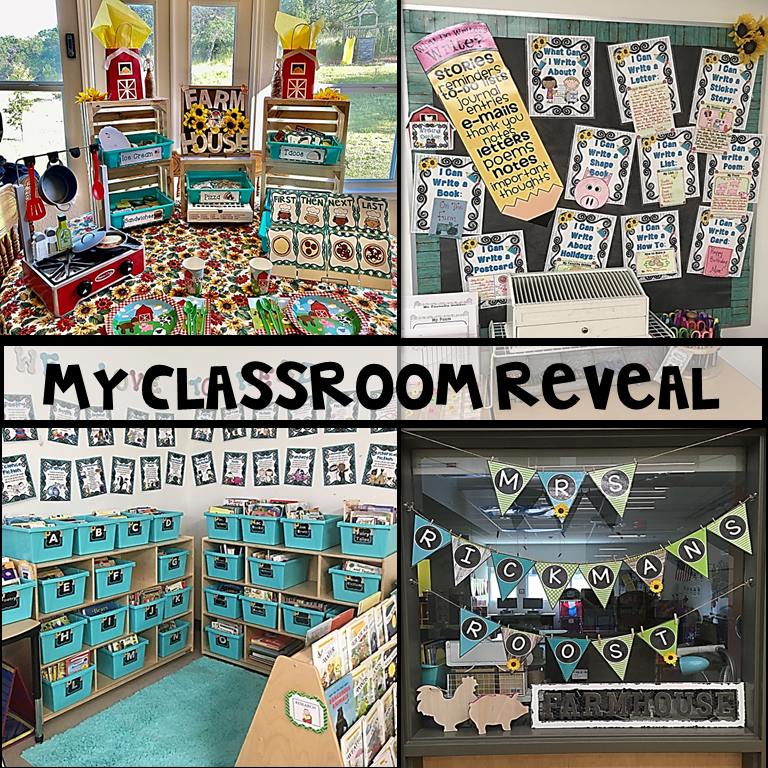
Do you want to ROCK your Classroom Organization? Well, guess what??? I’m very OCD and I LOVE to organize my classroom so I can find what I need quickly! If you’ve ever struggled with classroom organization- I’m going to give you 10 tips that have helped me over the years! I hope that some of these tips will help you as well. I don’t know about you, but it drives me crazy if I cannot find something, so I make sure to put it away in the correct place right away. Everything in my classroom has its correct place. I can’t wait to share my hacks with you so you will ROCK your classroom organization! If you’re interested in checking out my Classroom Reveal video, click here.
10 Ways to ROCK Your Classroom Organization
1.) Have “Days of the Week” drawers or bins to put your materials and supplies.
2.) Have a parent helper come and make copies for you on Friday.
3.) Have student supply bins or cubbies to put journals, binders, or folders.
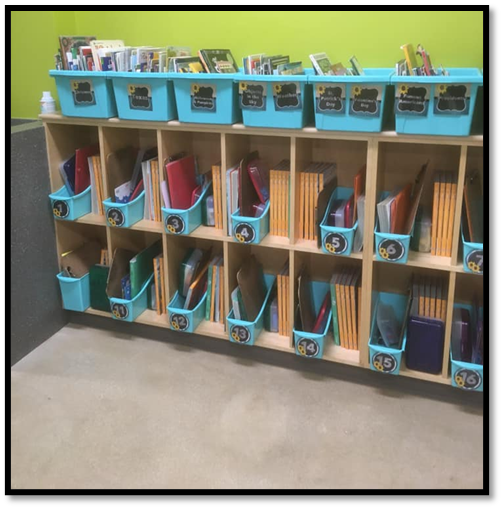
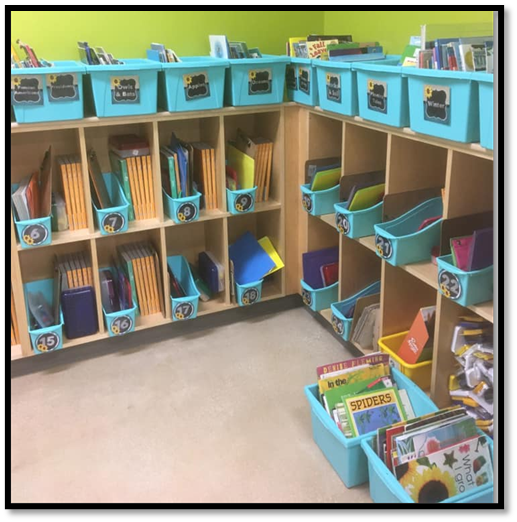
4.) Have book bins for your library, thematic books, and mentor texts with labels.
5.) Have binders for your thematic units with dividers inside.
6.) Pick up ALL papers at the end of the day and put them into a bin to grade.
7.) Send home all of your graded papers, newsletters, and office notes the same day every week.
8.) Have rainbow carts to put your math games, phonics games, and centers.
9.) Use a Toolbox to store your supplies.
10.) Always make a list of things to do for the next day to stay on top of things.
1.) Days of the Week Bins
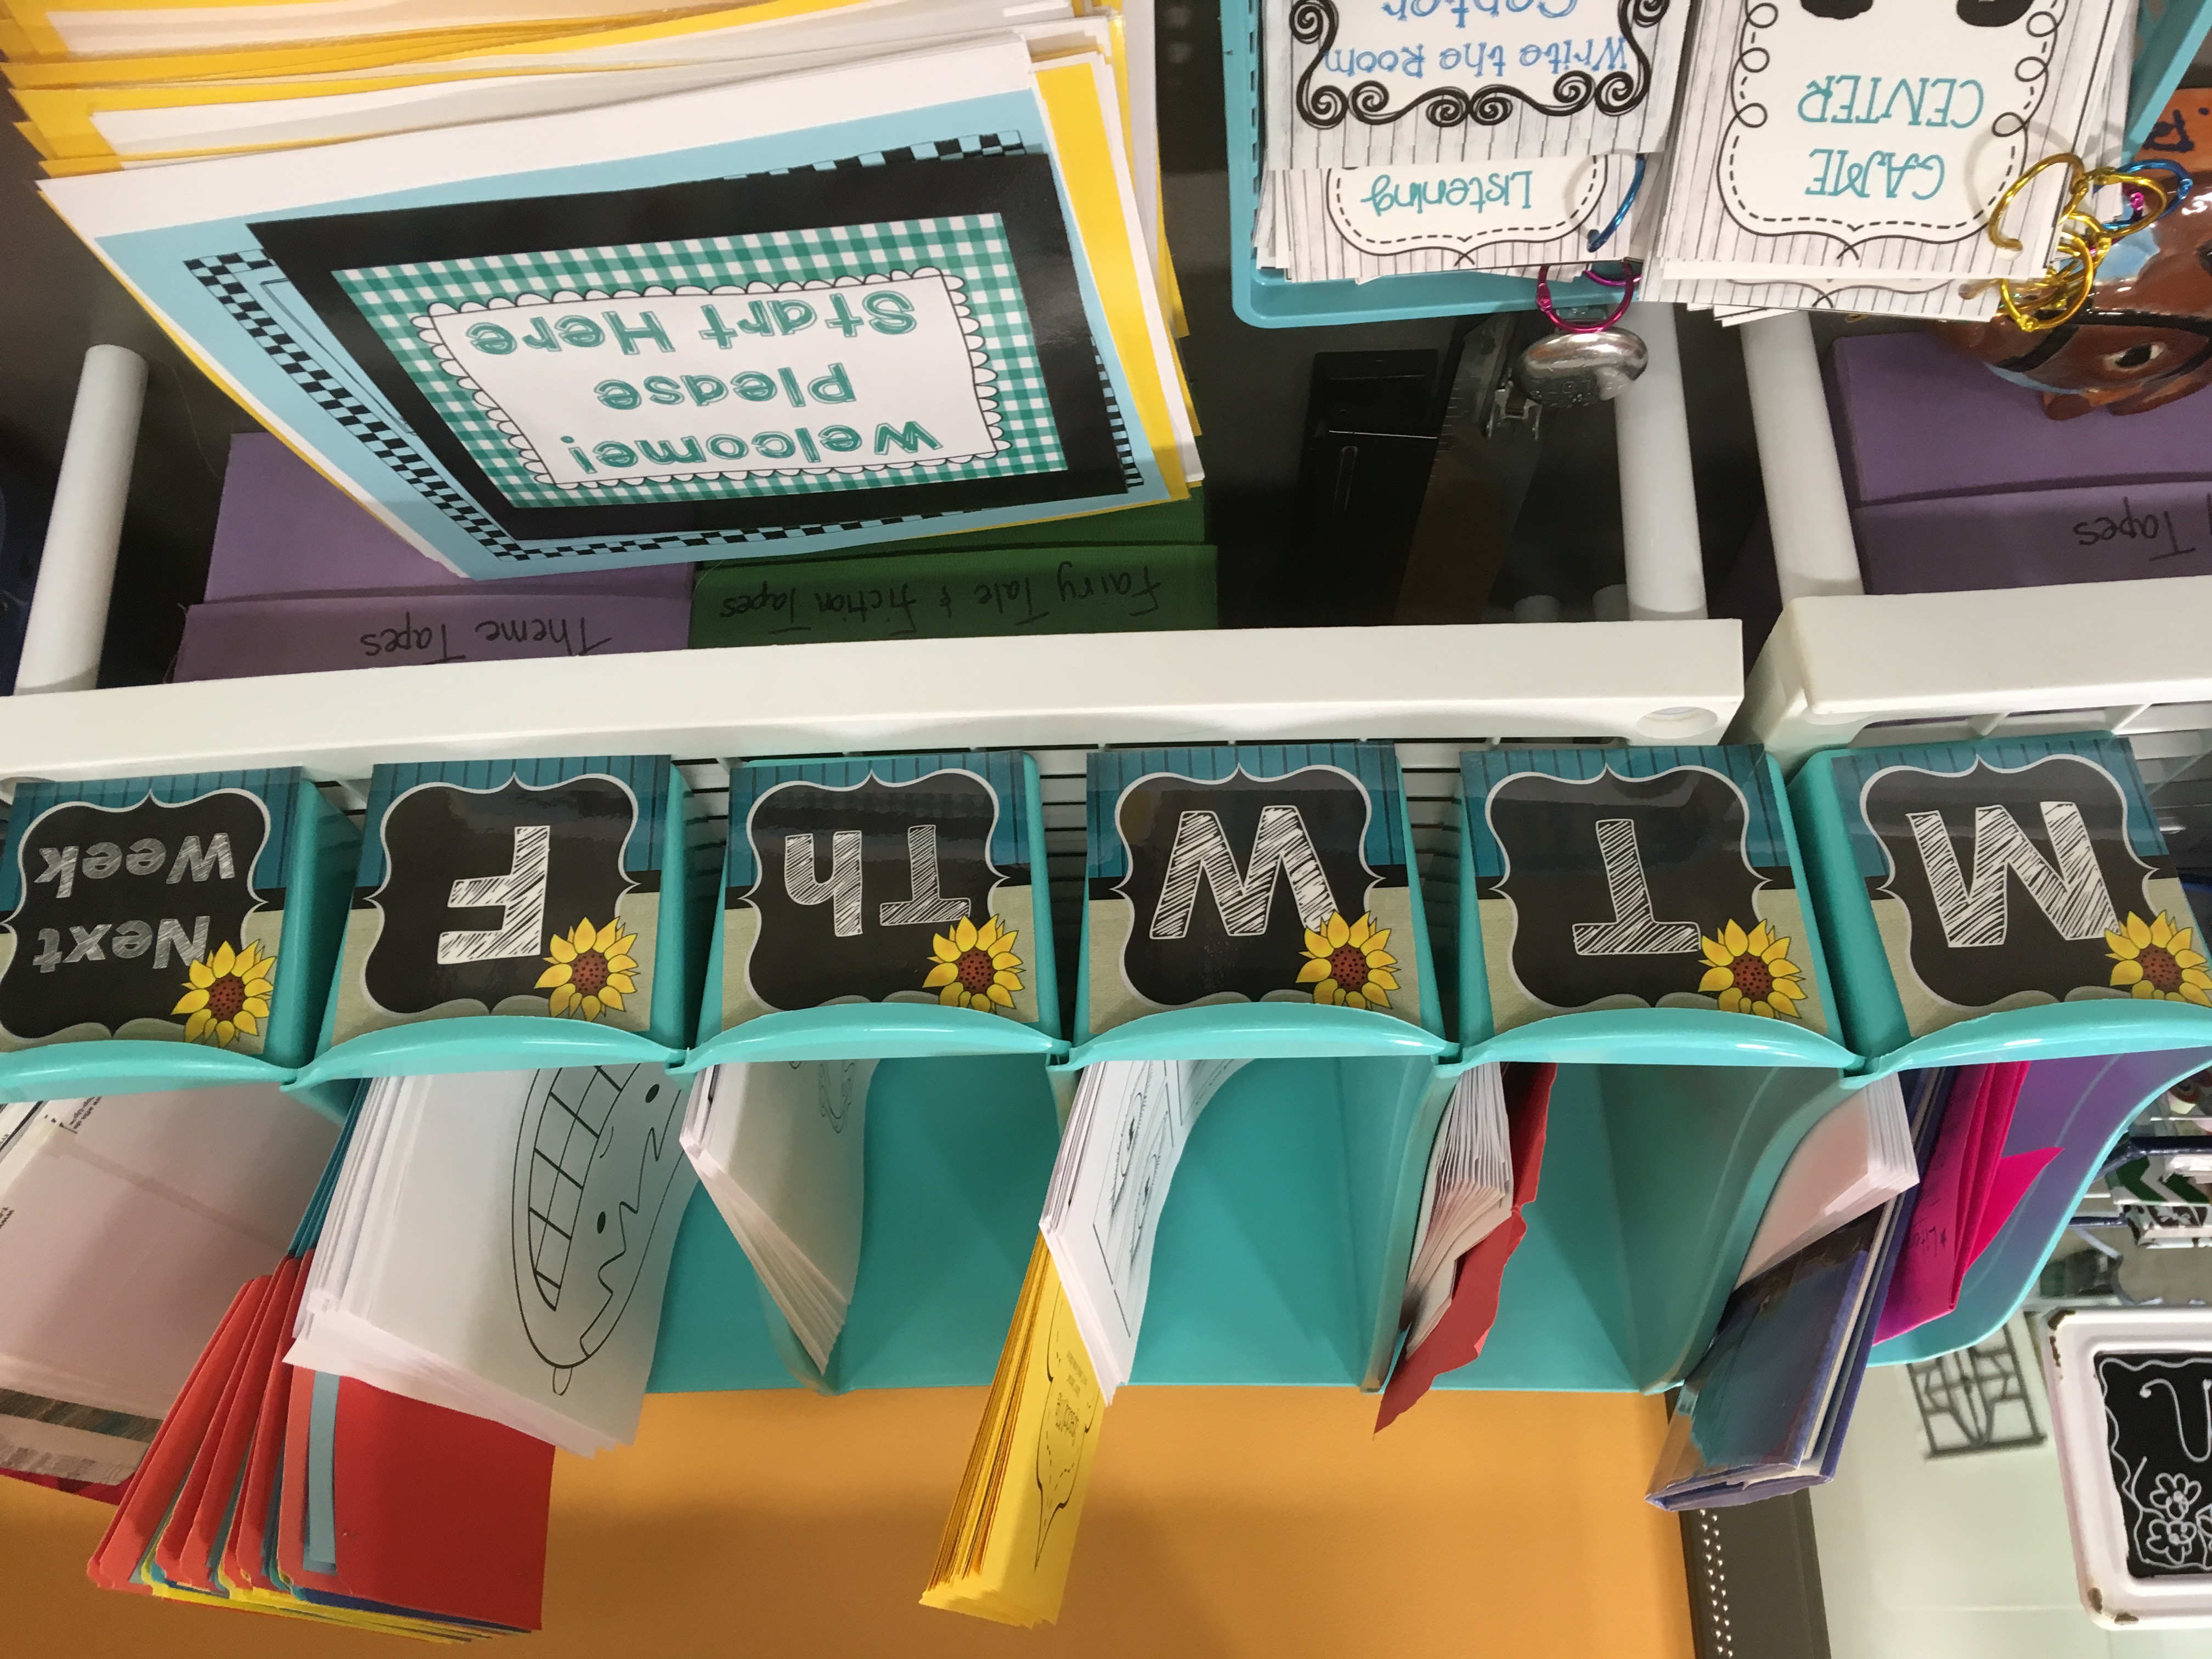
Above all, you need some kind of system to organize all of your materials, supplies, and mentor texts for the week. I use teal bins with days of the week labels. The last thing you want is to scrounge around trying to find your papers or mentor texts for your lesson. I get very stressed if I cannot find something, so I make sure I plan ahead and put it in the correct bin to find it fast. If you’re having to find something and have your back turned to the class, that’s when behavior problems can start happening. And, you will get frustrated.
So, having your materials and supplies ready to go for the day will help alleviate this stress! If you’re interested in checking out my days of the week labels, click here. This system also helps a substitute find your materials and supplies when they’re in your classroom. Also, it will help your team members find your materials if they need to!
2.) Get a Parent Helper
I highly recommend having a parent helper come on Fridays to help you make copies, laminate or make things for you. This alleviates a lot of pressure from me having to run all those copies. It may take some training at first, but after you do that, you’re good to go. My parent helper makes copies, laminate and cut out, organizes my closets, runs errands, fixes books, and whatever else I have in mind. It truly is a God send! This job is so difficult to do on your own.
Over the years I’ve learned to ask for help even though I may not have wanted help. I thought I could do it all! Now, I rely on having a helper and I don’t know if I could manage without one! If the helper comes on Fridays, you can have the whole week to get materials together for them to do for you! As my team plans on Wednesdays, I set aside the master copies for my parent helper so I have them ready!
3.) Binders for Thematic Units
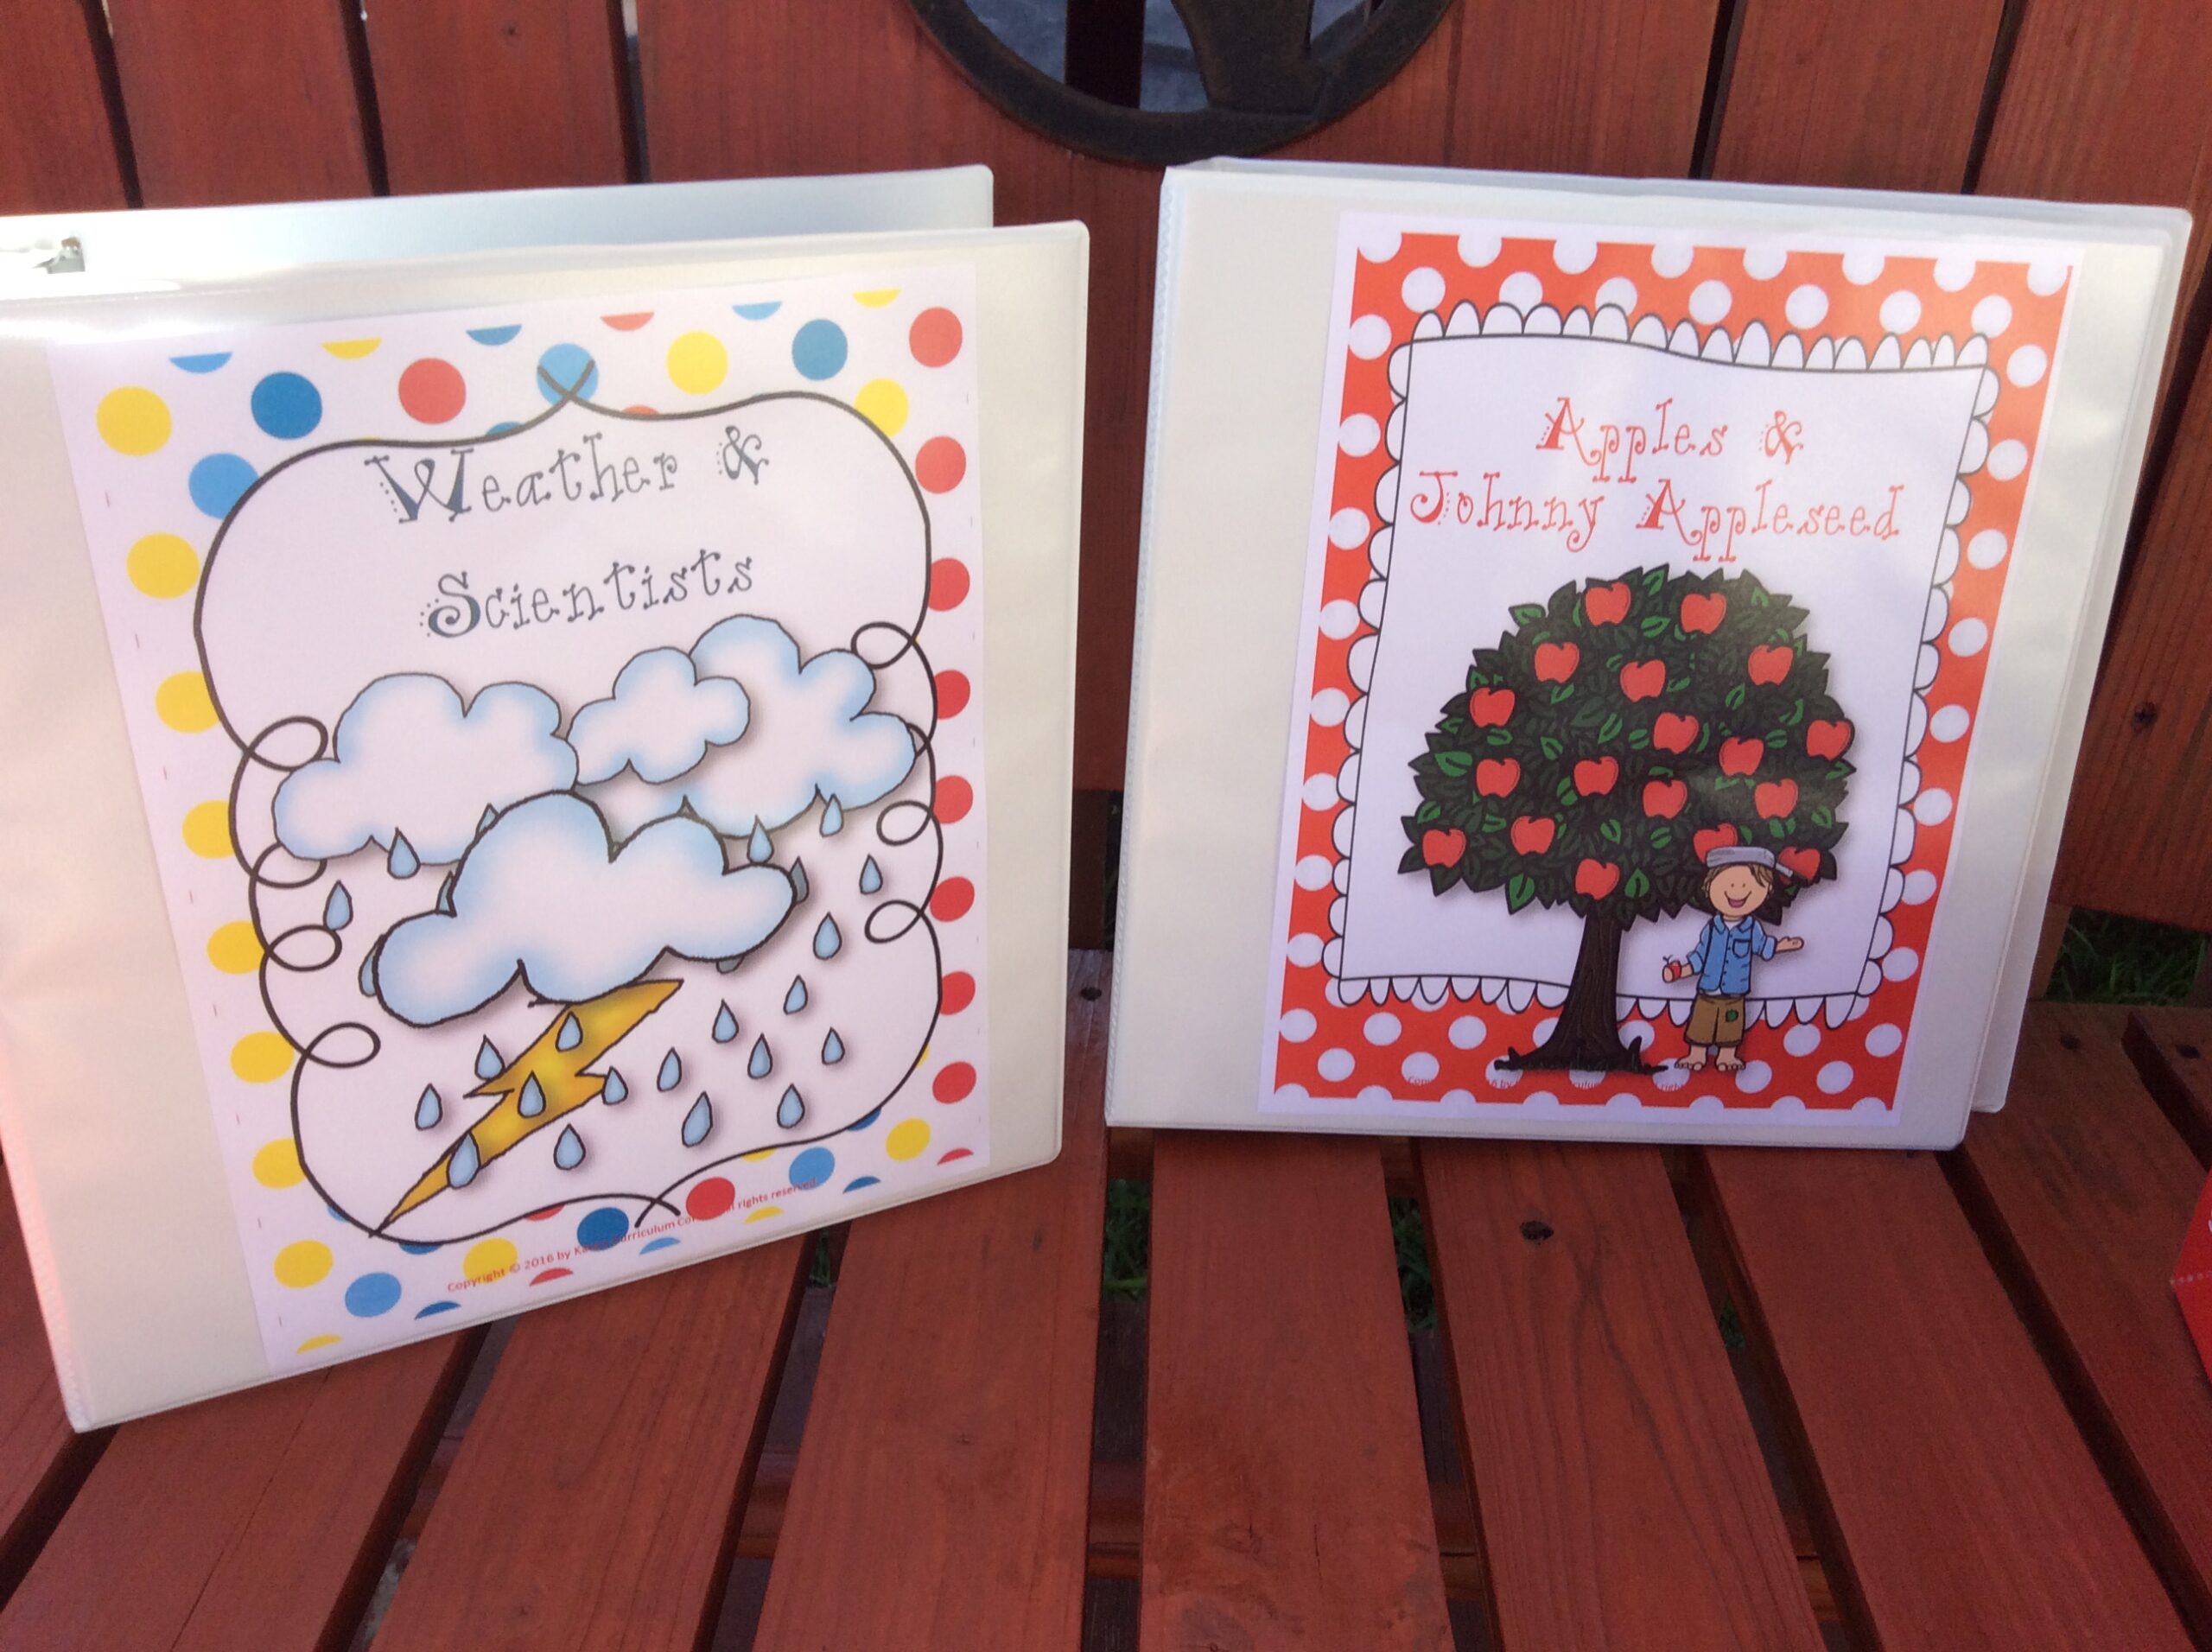
I LOVE my binder system! I have a binder for each thematic unit I teach. Here’s what I have:
All About Me/Back to School
Apples/Johnny Appleseed
Weather
Scientist
Community Helpers
Columbus/Maps
Bats/Owls
Pumpkins
Autumn/Scarecrows
Native Americans
Christmas Around the World
Penguins
Martin Luther King Jr.
Arctic Animals
Objects in the Sky
Presidents/American Symbols
Texas
Rainforests
Plants
Insects
Rocks/Fossils
Ocean/Sea Life
I have dividers inside each binder for Reading, Writing, Poetry, Math, Science, Social Studies, and Art. I make sure to put away my masters inside the binders as soon as I use them. I do not lay them in a pile on my desk for long. Having dividers inside really helps me find the master copy quickly especially when we have planning time.
I can take the binder to my planning meeting and pull out the masters that I need. Some teachers like to use manilla folders to store their copies, but I like the binders because I can have the dividers and the papers don’t fall out! If you’re interested in checking out my Thematic Binder Cover Pages for every month and holiday, click here.
4.) Student Supply Bins/Cubbies
The students need to be organized too! I can’t stand having messy desks especially if the student just shoves their papers inside and cannot find anything. Luckily, we don’t have desks, we have tables. So, I use book bins from Amazon. My students keep them on their desks with their folders and journals. In years past, I would have them put inside a crate, but now I find it easier to just leave them on their desk. The students’ job is to dump out all the trash every day when we do pack ‘n stack. I used to have different colors that matched the crates, but now all of my crates are teal to match my Farmhouse Theme.

On top of the crates and drawers, I have a basket. This is where my students turn in all of their work. Each table group has its own basket. This helps with the traffic in the classroom so the students don’t have to walk across the room to turn in their papers. I have 5 table groups: Calico Cats, Red Roosters, Pink Pigs, Palomino Ponies, and Gray Goats.
5.) Book Bins for Library, Mentor Texts, and Thematic Books
All of my books have a place in my classroom. My library is organized by author, genre, and reading level. My reading levels are from A-O. My genres are fiction, non-fiction, fairy tales, animal books, Alphabet, and realistic fiction. My author tubs are Jan Brett, Kevin Henkes, Laura Numeroff, Eric Carle, Tomie dePaola, Gail Gibbons, and Marc Brown. On top of the library, I have genre cards.
When I teach a certain genre, I pull the card off the wall to teach about it, then put it back up. My reading levels are for Reader’s Workshop and my genres/author books are for centers. If you’re interested in checking out my library genre labels, click here. If you’re interested in my reading genre posters, click here.
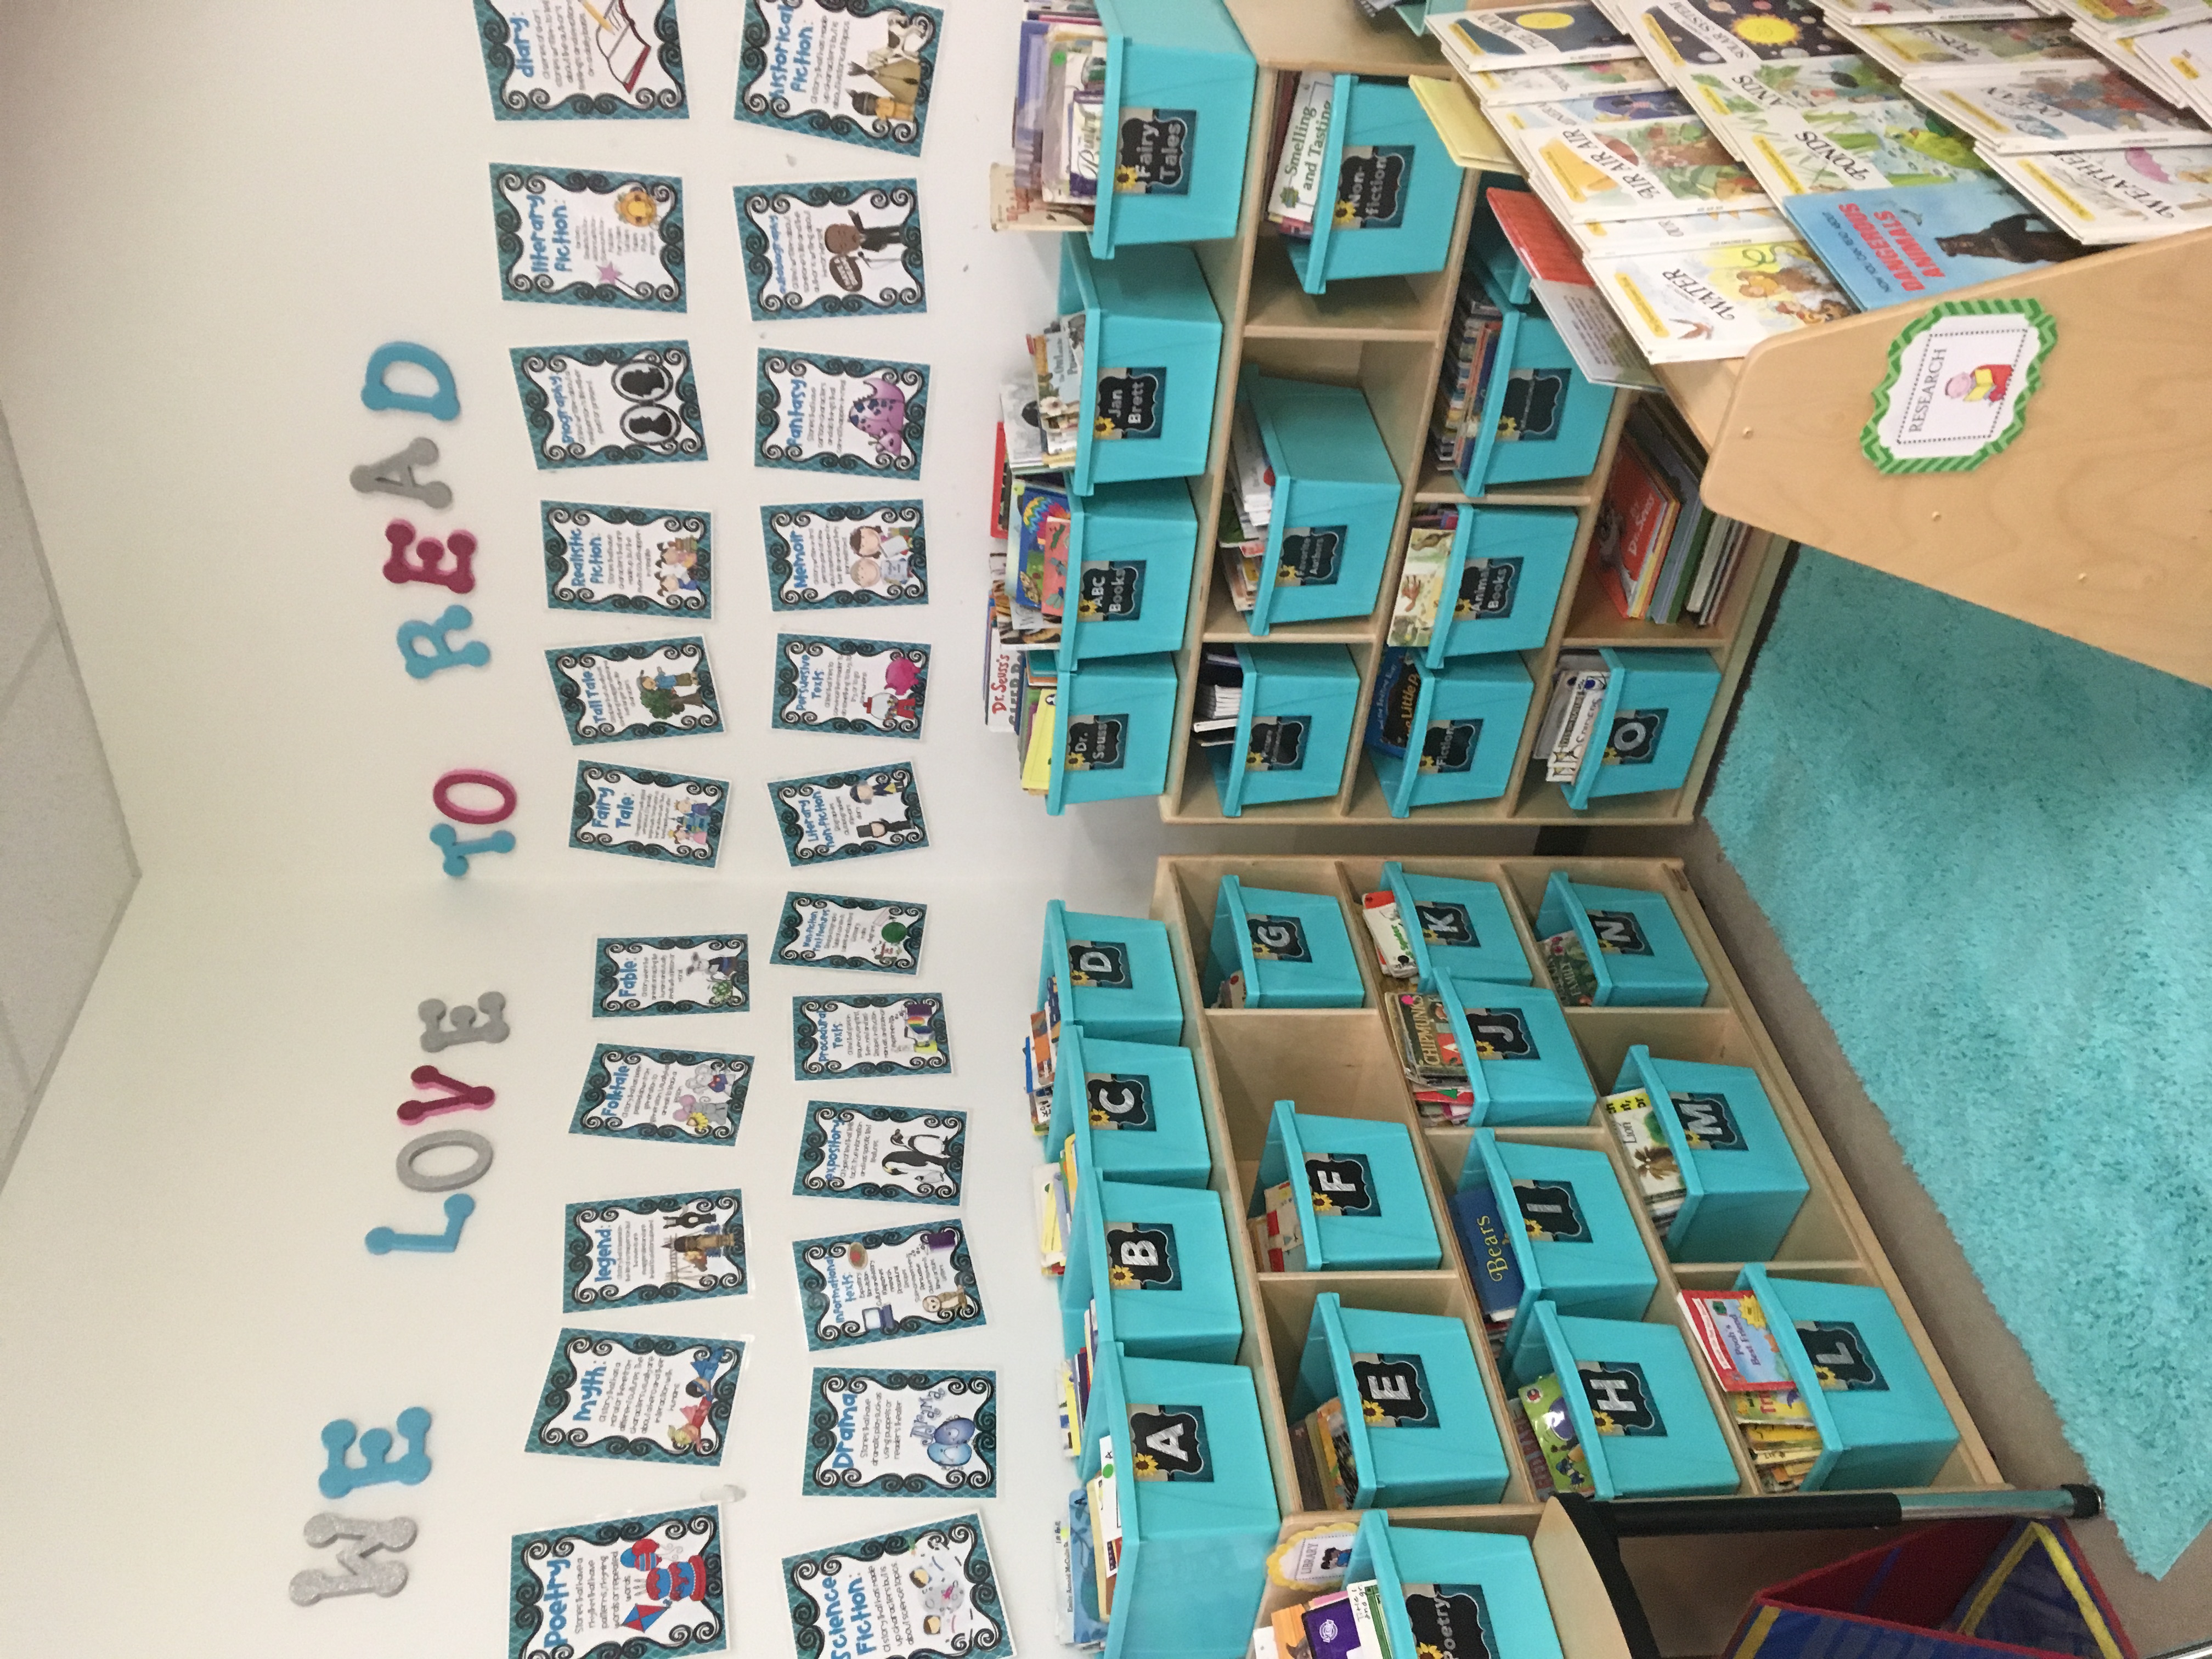
These are my Thematic Books- I have them organized by themes- the same as my binders.
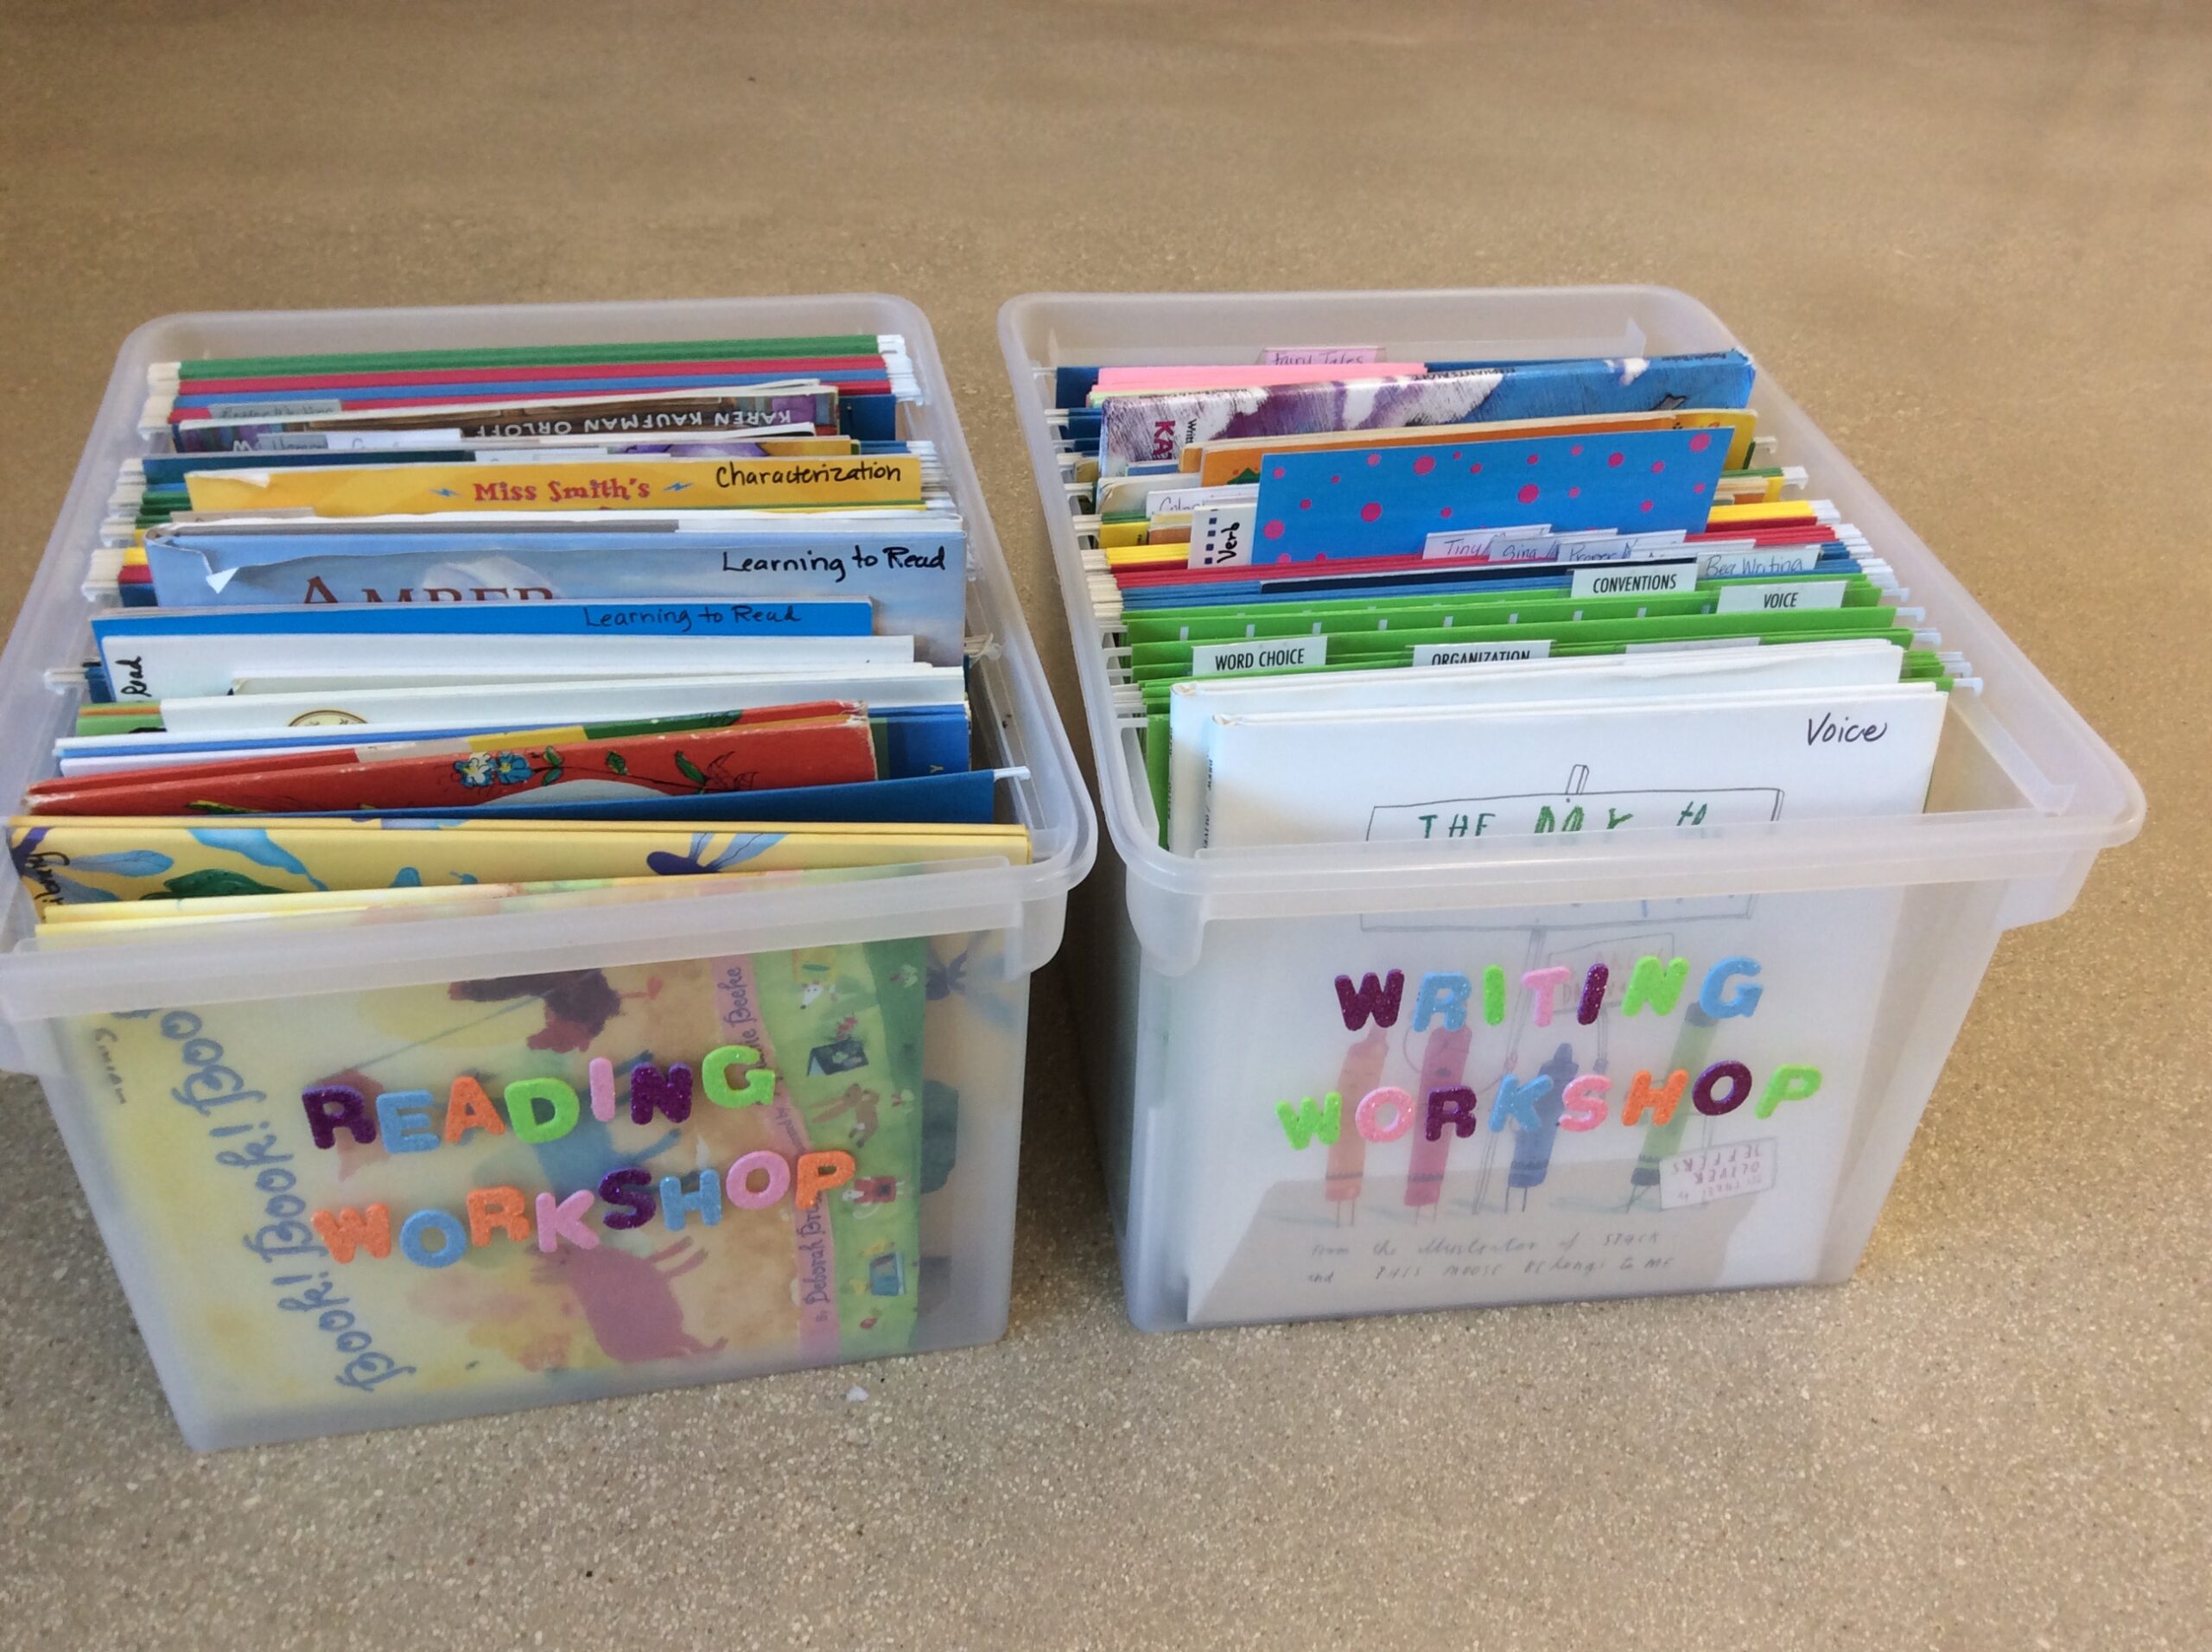
I have my mentor texts organized by Reader’s, Writers, and Math Workshop. Inside each clear tub, I have hanging dividers with different skills. I also write the skill on the top right hand of the book so I know where it goes. If you’re interested in watching my YouTube video of how I organize my mentor texts, click here.
The dividers for Reader’s Workshop are:
Beginning to Read
Text to Self Connection
Text-to-Text Connection
Text to World Connection
Cause/Effect
Main Idea/Details
Story Elements
Synonym/Antonym
Figurative Language
The dividers I have for Writer’s Workshop are:
Beginning to Write
Tiny Moments
Nouns
Verbs
Adjectives
Prepositions
Pronouns
Editing/Revision
Onomatopoeia
Dialogue
The dividers I have for Math Workshop are:
Counting to 10
Addition
Subtraction
Greater Than/Less Than
Place Value
Skip Counting
Counting Money
Measurement
Time
2-D/3-D Shapes
Fractions
Large Numbers
6.) Pick Up ALL of the Papers at the End of the Day
I don’t like clutter, and especially loose papers everywhere. Each day after the students leave, I go around and collect all of their papers from the baskets. Some things I grade and some things I don’t grade. I have a black rolling cart where all the papers go. This cart goes home with me every Friday so I can stuff my student’s red Monday folders over the weekend. Some teachers hand back their papers every single day, but I don’t. I always send home my papers on the same day. This keeps my papers organized so they’re all in one place.
7.) Always Send Home Your Papers, Newsletters, and Notes on the Same Day
To piggyback on number six, all of my graded papers, crafts, newsletters, and notes from the office all go home on the same day…MONDAY. I have a special Monday Folder that I use to stuff all the papers for each child. On Monday morning, when the students come into the classroom, I have their red folders sitting on their desks. They immediately put their folders into their backpacks. I tell my students that when they get home, they need to empty out the papers and return the blank folder the next day.
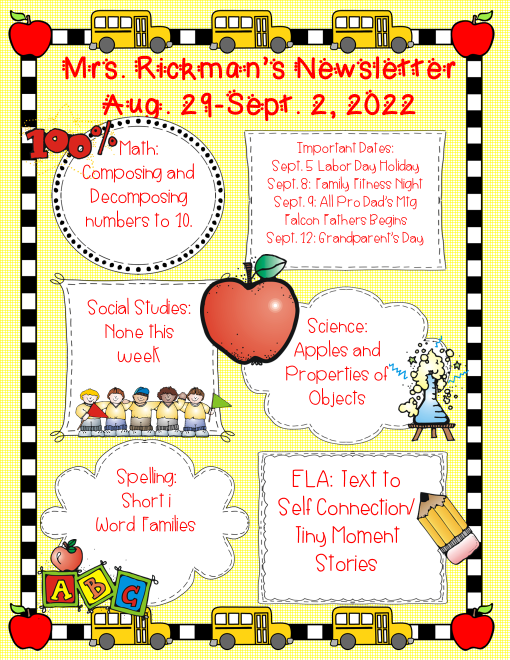
If we have Monday off, then the red folder goes home on Tuesday. This way, my parents always know what day of the week they will receive their child’s papers. My parents LOVE this system because they know when to expect their child’s papers. I also email my newsletter every Sunday evening to give my parents a heads-up of what’s happening for the week. I know some parents may not check their email, so I send home a hard copy as well. If you’re interested in my editable newsletters, click here. I have them for each month and holiday!
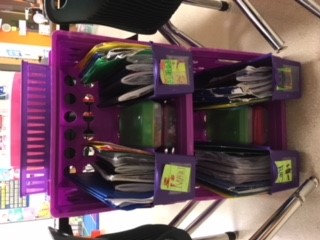
8.) Use a Rainbow Cart to Store Your Centers
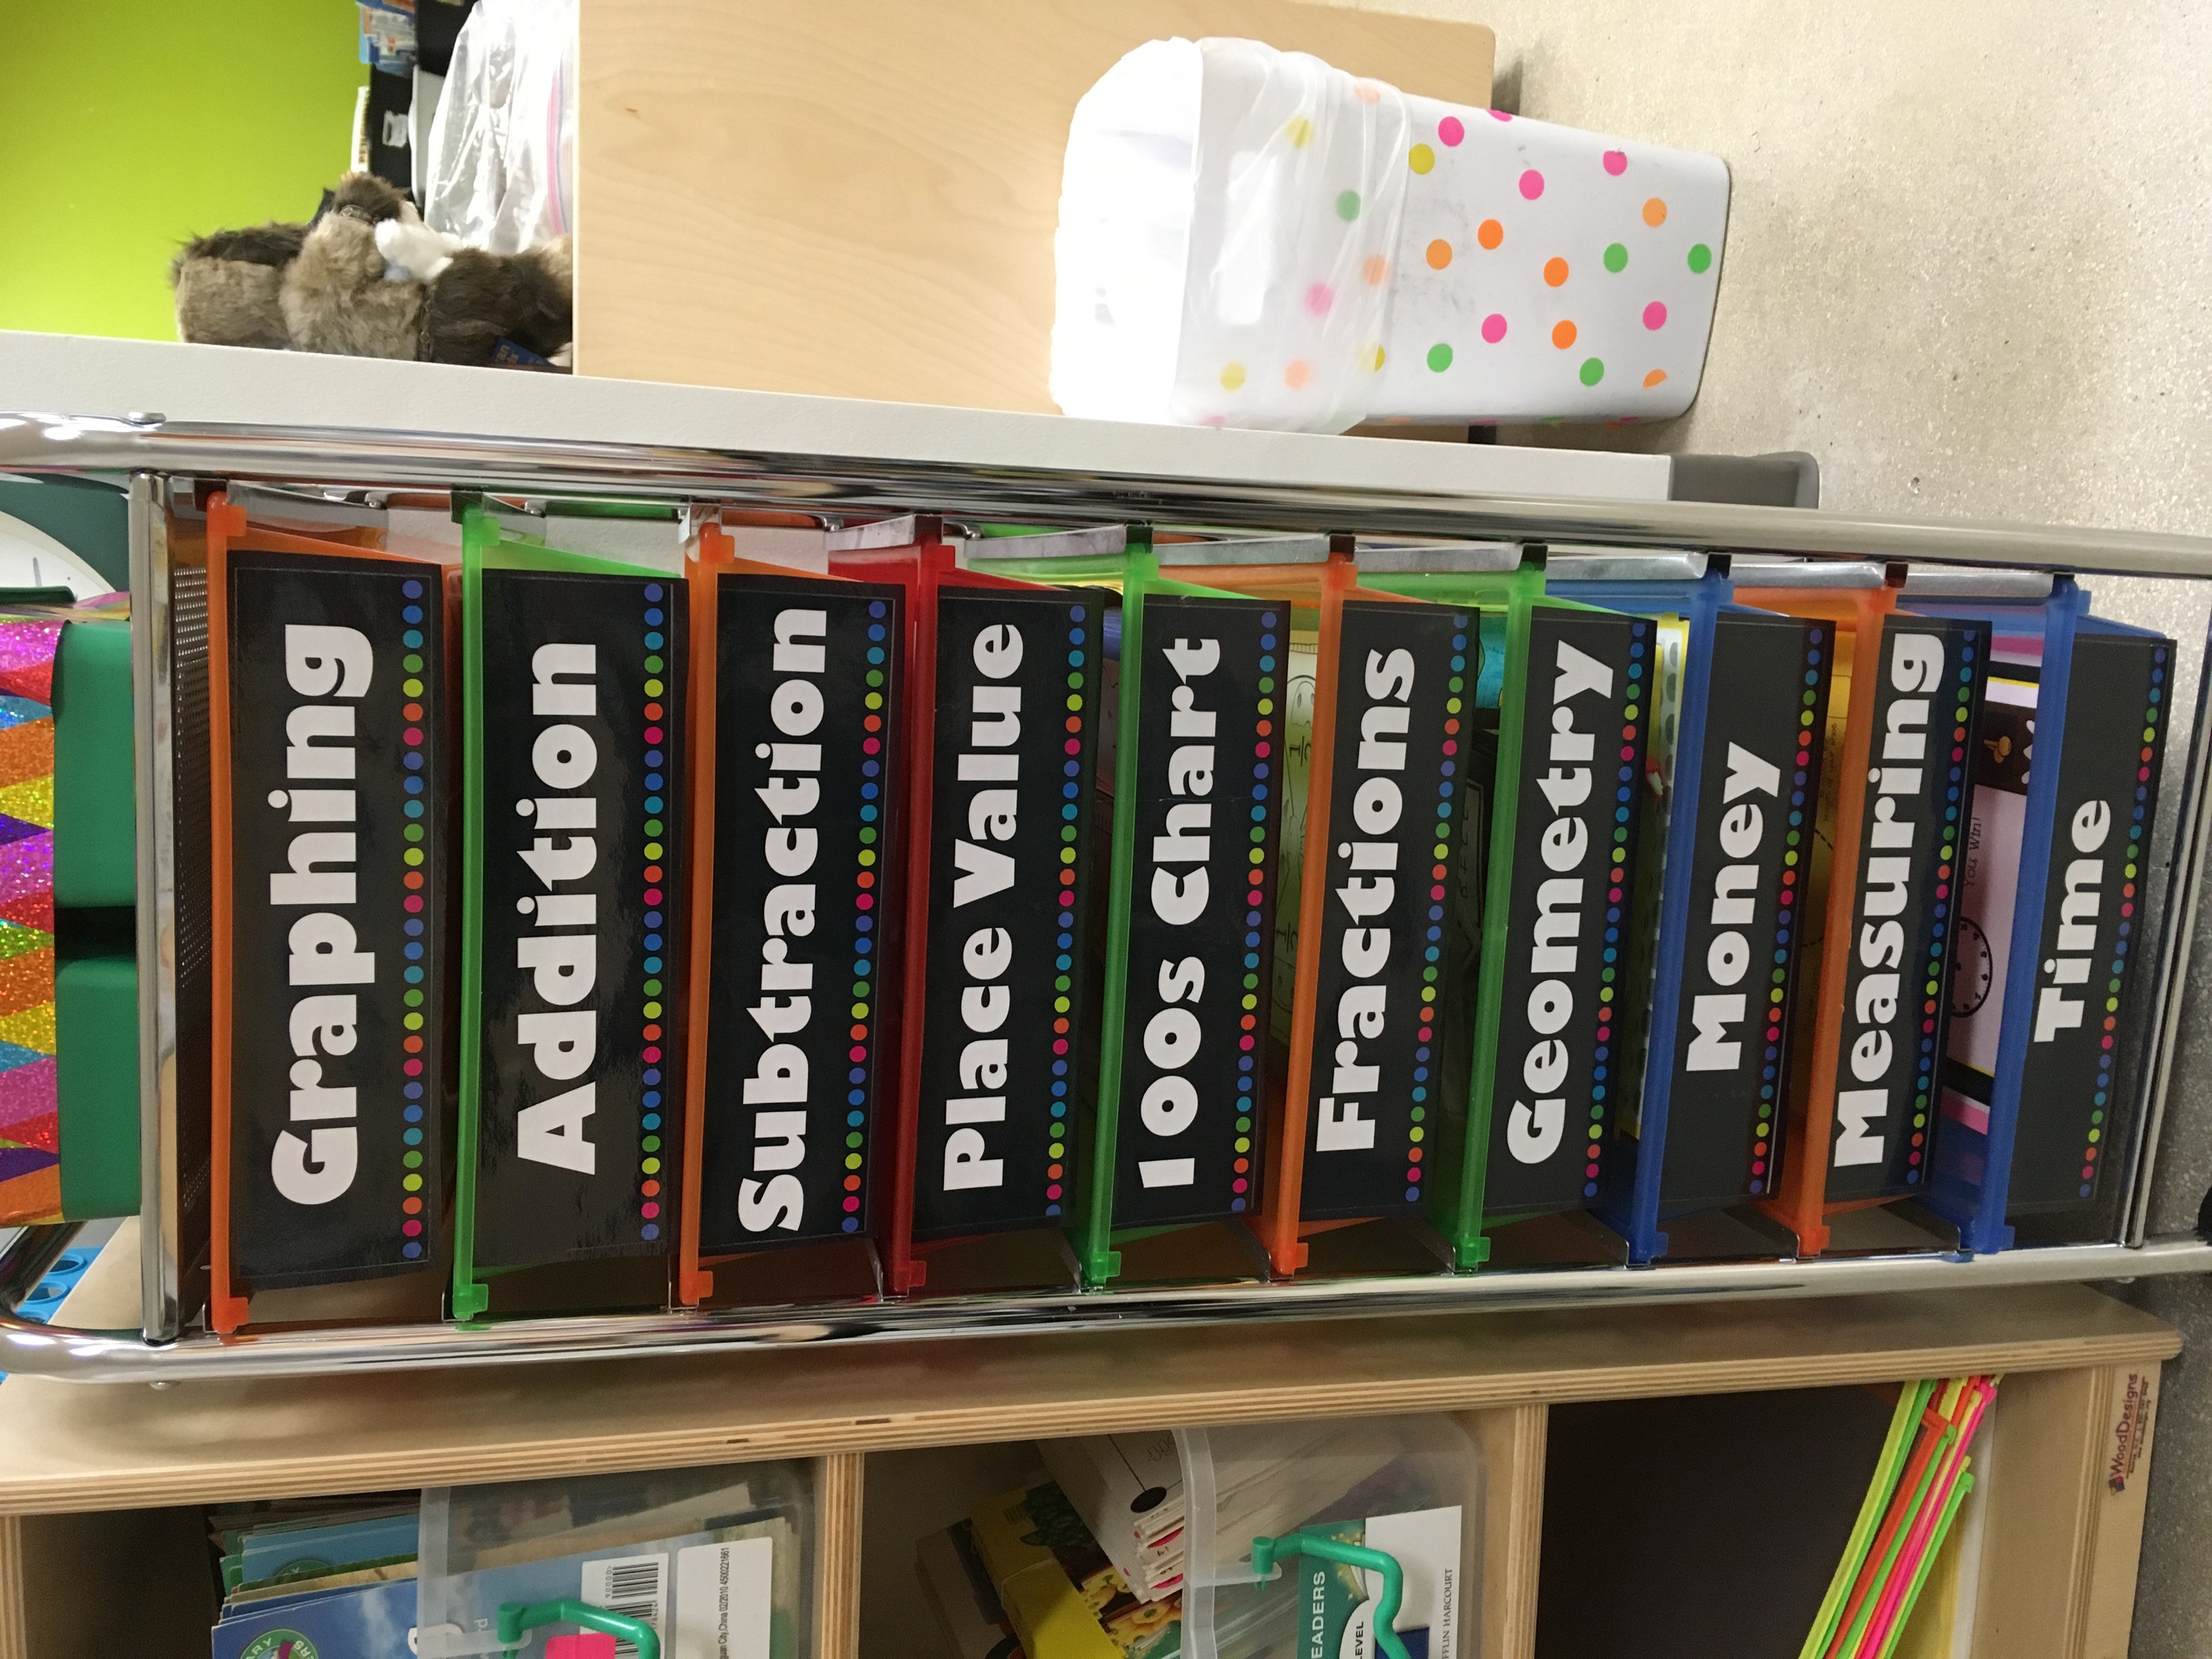
I LOVE using rainbow carts to store my centers for math and phonics! For math, I have my drawers separated by Graphing, Addition, Subtraction, Place Value, 100’s Charts, Fractions, Geometry, Fractions, Measurement, and Time. Inside each tray, I have games and activities that I use at my teacher table that go inside a clear plastic sleeve that my students can write on.
I keep this cart right next to my table so I can take out the tray and change out the activities quickly. I always teach a new game or activity at my teacher table BEFORE I put it in the center. This way I’m not interrupted with questions on how to play the game when I’m teaching other students. This saves me so much headache!
For phonics, I have my drawers separated by: Short/Long A, Short/Long E, Short/Long I, Short/Long O, and Short/Long U. Inside each drawer I have sound mapping mats, Build It, Write It mats, word family cards with pictures, and decodable passages for each vowel sound. I highly recommend using a drawer system like this to store your center games. You could organize them by thematic unit, month, holiday, skill, or whatever you like! See, it’s fun to be organized!
9.) Use a Toolbox to Store Your Supplies
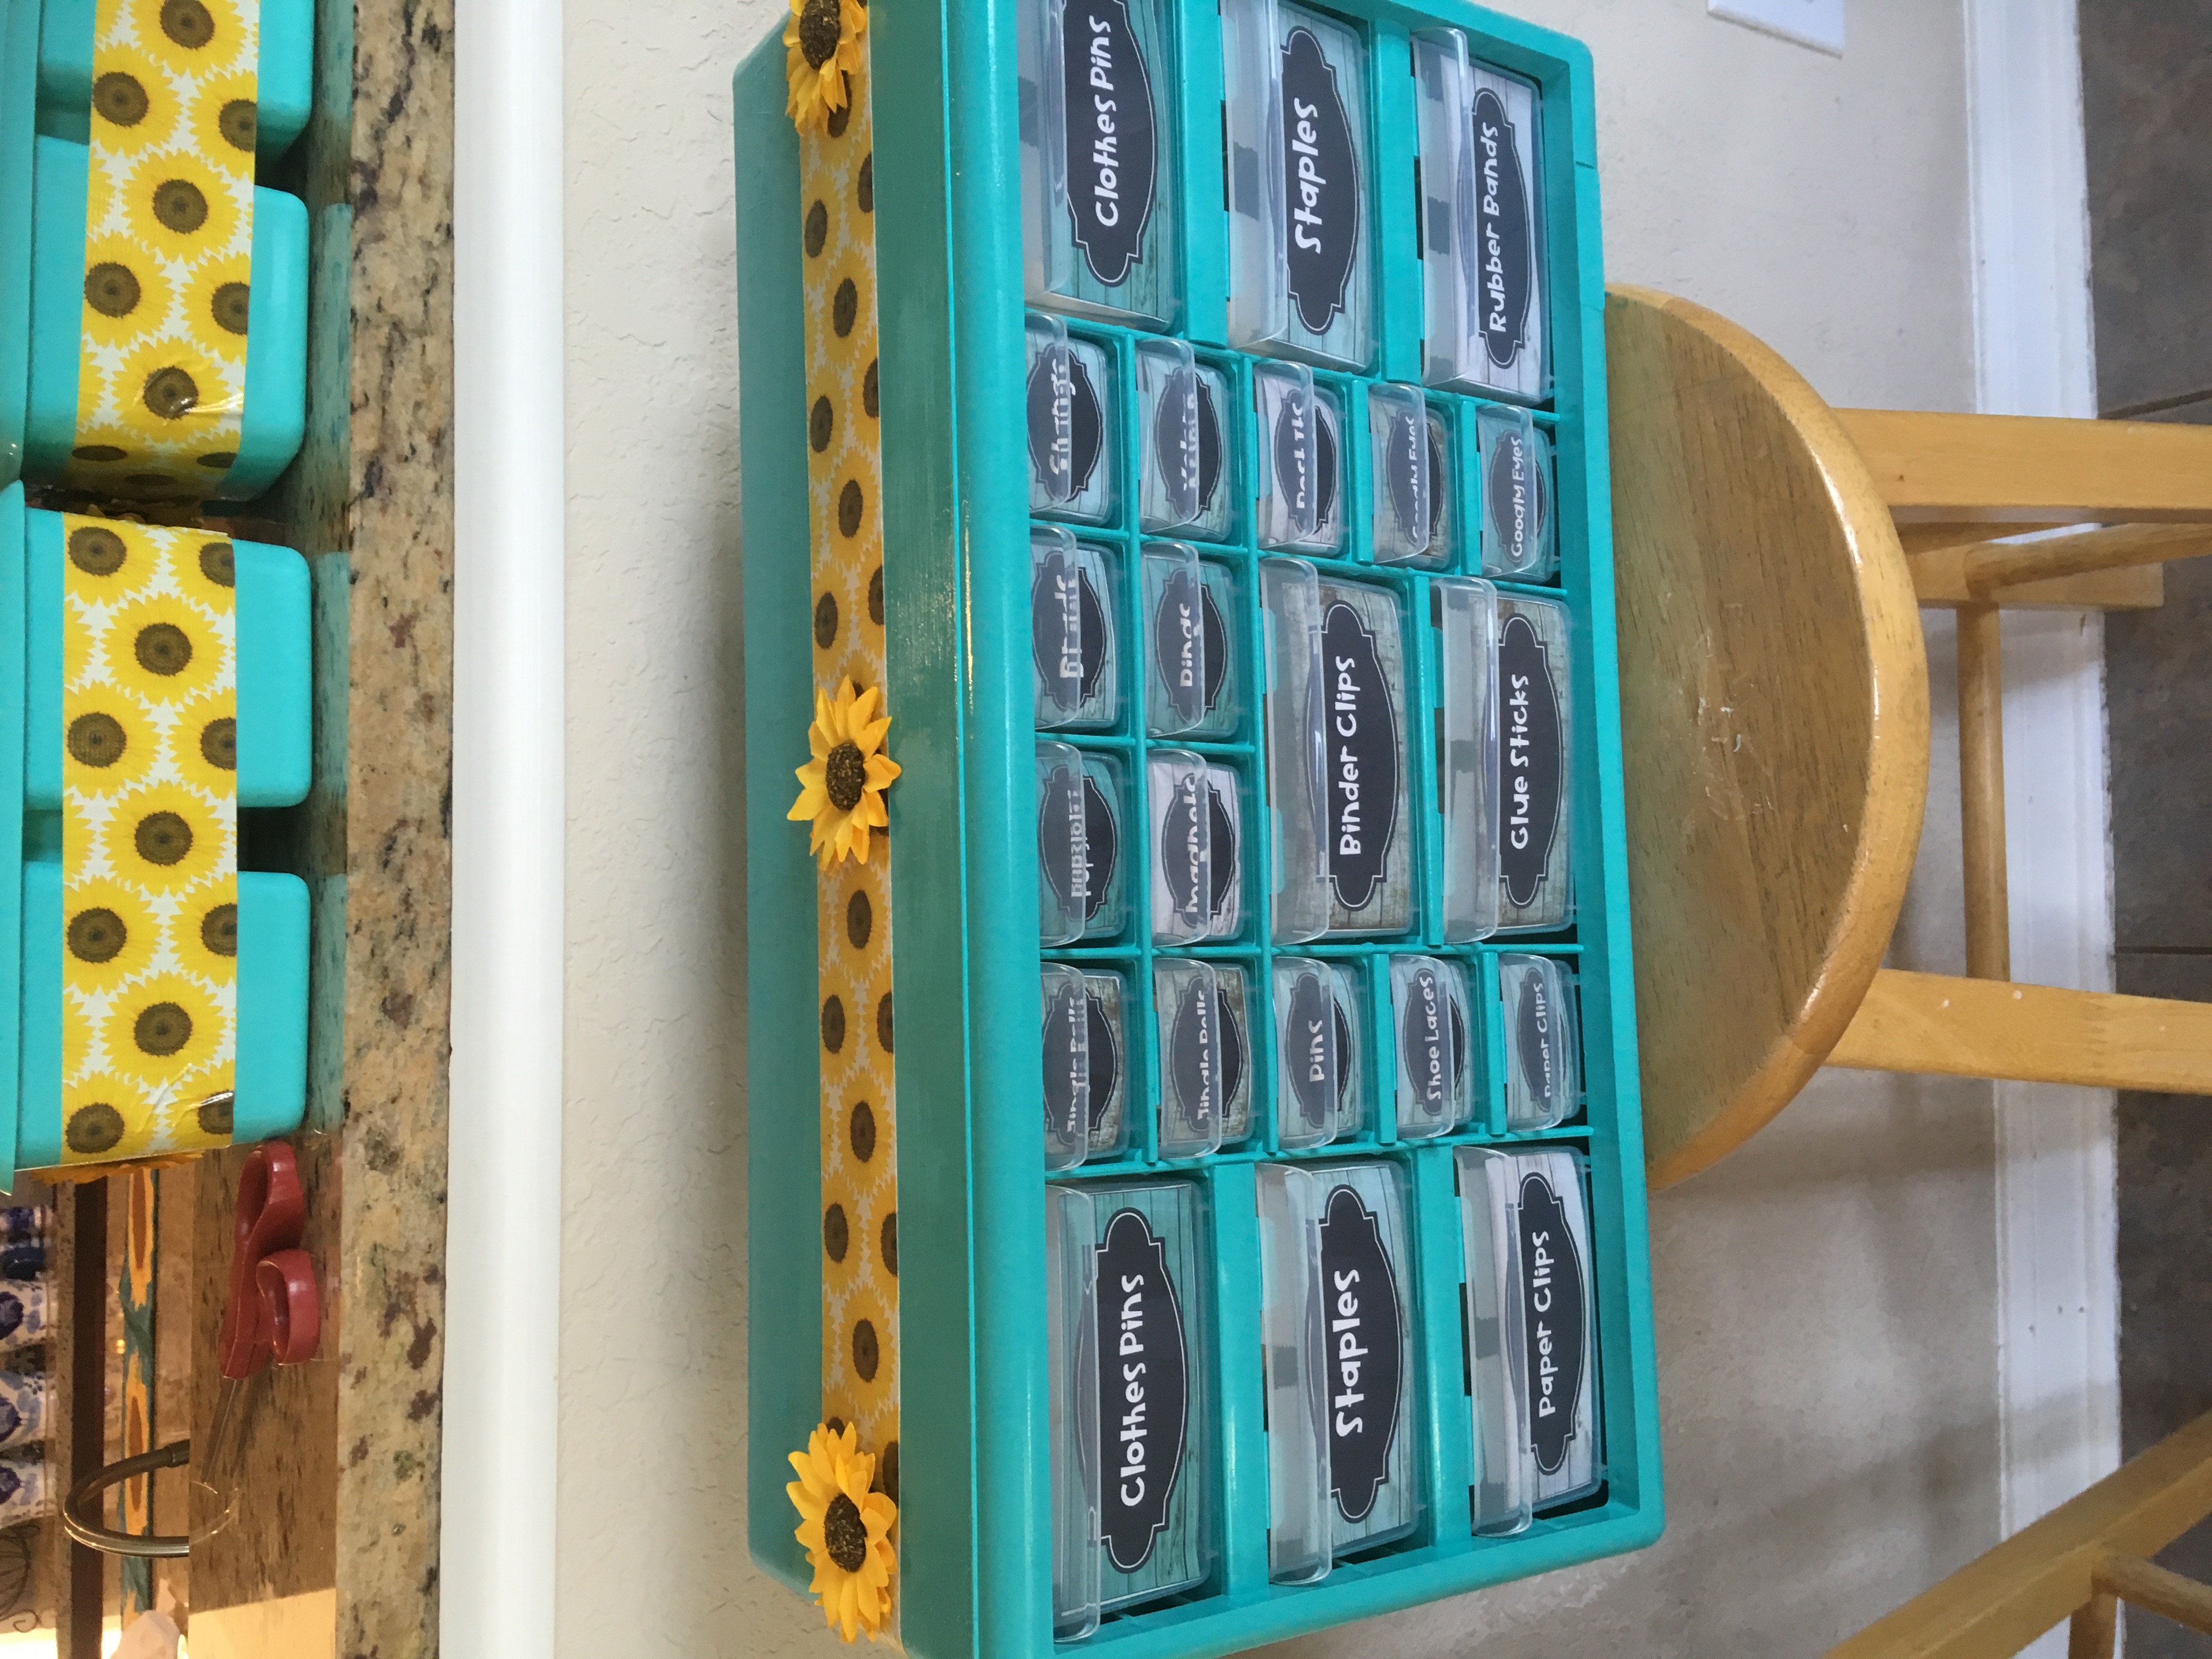
You’ve got to have a toolbox to store your supplies! This has been a HUGE lifesaver for me! You can even spray-paint the toolbox to match the colors and theme of your classroom! Inside my toolbox, I store staples, glue sticks, rubber bands, paper clips, clothes pins, binder clips, googly eyes, magnets, jingle bells, loose change, brads, and pins. I bet that I use my toolbox about 10 times a day! There’s always something that I need from it! There are a ton of labels on TPT for free!
10.) Always Make a List of Things to Do for the Following Day
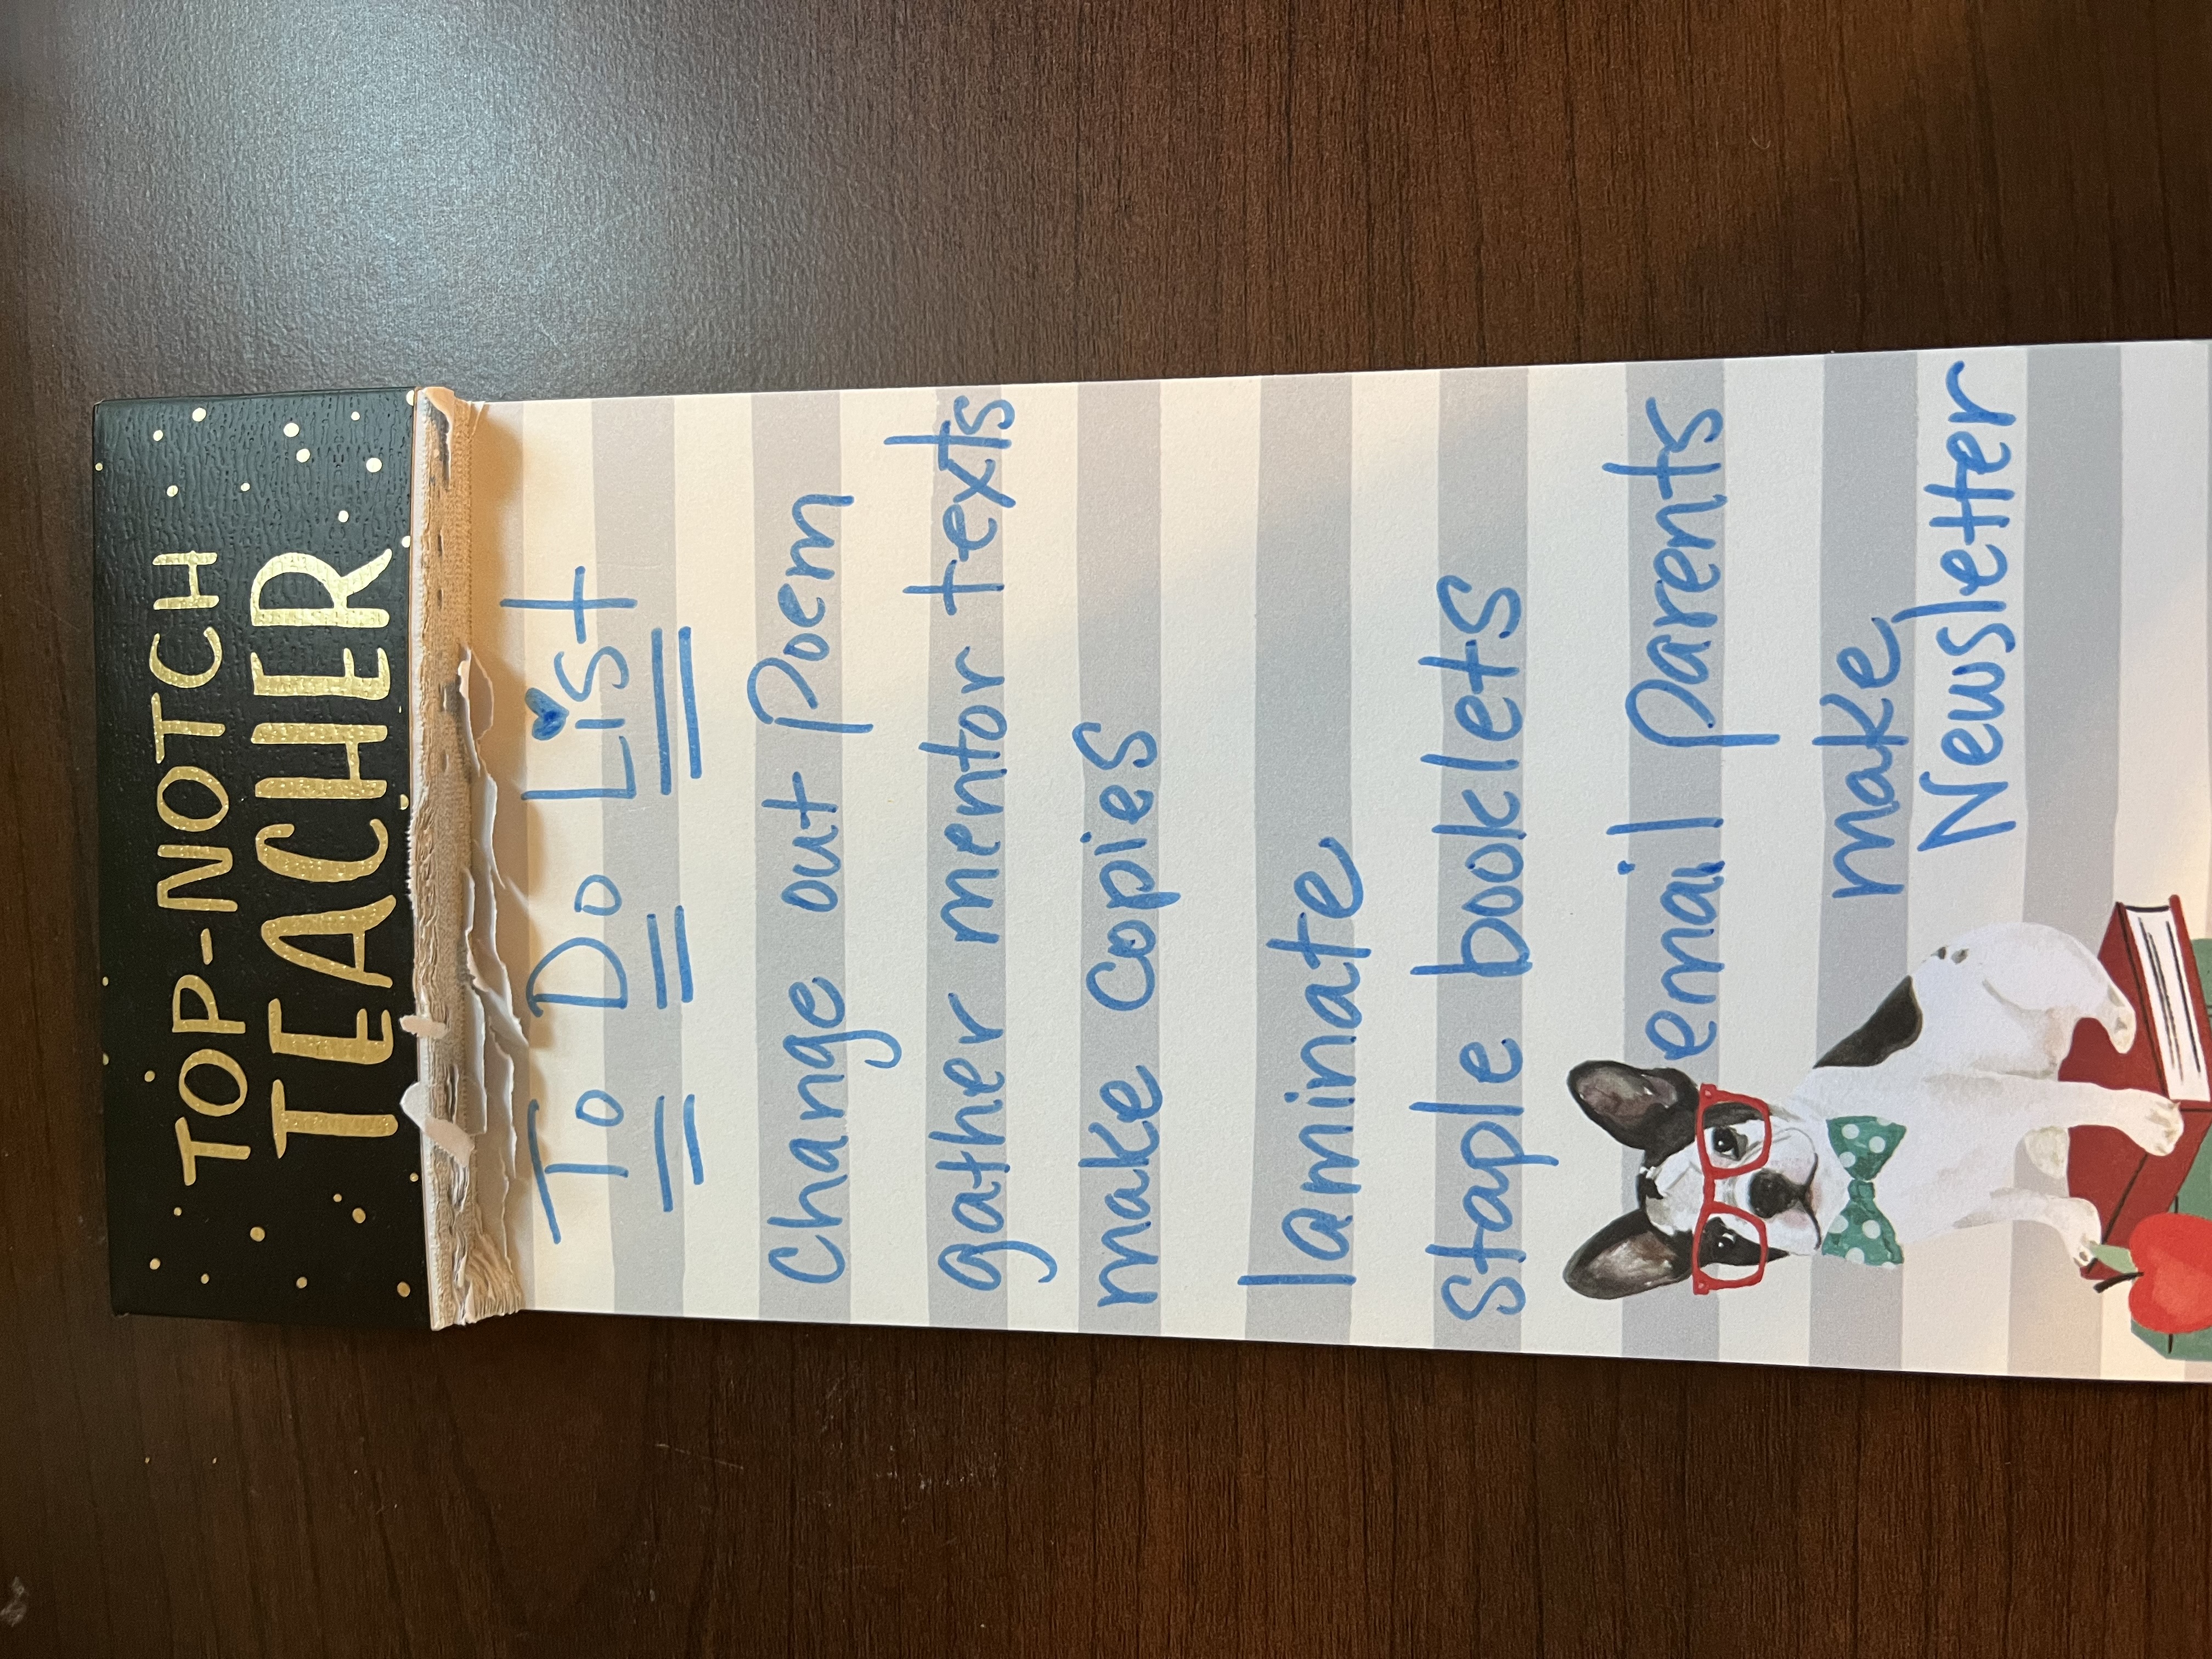
Each afternoon before I leave for the day, I make a quick list of “To Do’s” for the next day. The ideas are fresh on my mind so I make a list so I don’t forget. If I get to school early, I try to knock out what’s on my list. If I don’t get there with enough time, I prioritize and make sure to only do the upmost important things first.
Usually, it’s making a quick copy of something I forgot, or gathering supplies that I need for a lesson. This is a very easy way to stay on top of things that need to get done. It’s so easy to forget all of those “small” things that you need to do unless you write them down. Don’t be afraid to make lists!
I hope that you got some great ideas about how to be organized! In my opinion, you need to be as organized as possible in order to stay ahead of the game. I don’t know about you, but I get stressed if I can’t find what I need quickly.
Also, if another teacher comes to me asking if they can borrow something, I know exactly where it is. Good luck with ROCKING your classroom organization! If you’re interested in checking out my Back to School Tips and Tricks Blog post, click here.
Until next time, let’s take your classroom to the next level!